Search This Blog

Showing posts with label MOSS. Show all posts

Thursday, January 13, 2011

SharePoint Designer Workflows 3 - Developing a Timer Loop for Workflows

1. Introduction: Many times when designing workflows there is a need to use a Workflow Timer. As you may know a workflow timer will process workflows at a specified time or interval. While SharePoint Designer does not provide an out of the box (OOTB) capability for creating workflow timers, still, there is a way to create a workflow timer using SPD workflows.

2. Scenario: In our simple scenario we want our example workflow to run every five minutes. Now, given this is not a very realistic scenario, most users will want the workflow to run once a day, week, month, etc. However, once we have designed the mechanism to run a workflow every five minutes, it’s a simple matter of changing the pause delay to increase that to any duration needed.

3. Explanation: Essentially we will have two workflows, running on two separate lists; one workflow, “Endless Loop”, creates an endless loop and the other workflow, “Delay”, one creates a delay or timer. The logic for the Endless Loop workflow looks like this:

a. Calculate (increment) the loop counter

b. Update the item in the Delay workflow with the counter value

c. Log the Event

The logic for the Delay workflow looks like this:

a. Calculate (increment) the loop counter

b. Pause (Delay) for a period of time

c. Update the item in the Loop workflow with the counter value

4. Overview: To build a Workflow Timer we will need two SharePoint lists, and two SharePoint workflows. The first list will contain our Loop workflow, and the second list will contain our Delay workflow. For obvious reasons we will call the first list “Endless Loop” and the second list “Delay”. To create the lists follow these steps:

a. From the SharePoint site create a custom list, call it “Endless Loop”

b. From the Loop list add a custom Number column, call it “Counter”, set it’s number of decimal places to 0 and it’s default value to 1, finally add it to the default view

c. Create 1 item in the list and title it Endless Loop

d. From the SharePoint site create a custom list, call it “Delay”

e. From the Delay list add a custom Number column, call it “Counter”, set it’s number of decimal places to 0 and it’s default value to 1, finally add it to the default view

f. Create 1 item in the list and title it Delay

To create the workflows for these lists follow these steps:

a. From SharePoint Designer create a workflow that is associated with the Endless Loop list, call it “Endless loop”

b. Set this workflow to be started manually and to start automatically when an item is changed

c. Create 1 step for the workflow, call it “Endless Loop”

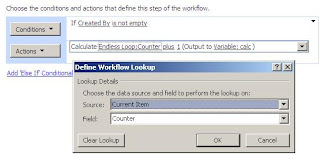
d. Create a condition – If Created By is not empty – this means the workflow will always run

e. Add a Do Calculation item, set it to Calculate Endless Loop: Counter plus 1 (output to Variable: calc), the configuration should appear as below:


f. Add an Update List Item activity, update the Delay list, Delay item, changing the value of Counter to the workflow calc variable’s value, configure the activity as shown below:


g. Add a Log to History List activity, configure the log to write “Endless Loop – Ran”

h. The complete workflow configuration should appear as below:


i. From SharePoint Designer create a workflow that is associated with the Delay list and call it “Delay”

j. Set this workflow to start automatically when a item is changed

k. Create 1 step for the workflow, call it “Delay”

l. Create a condition – If Created By is not empty

m. Add a Do Calculation item, set it to Calculate Delay:Counter plus 1 (output to Variable: calc), the configuration should appear as below:


n. Add a Pause for Duration activity, pause for 5 minute (this is only a place holder testing value that can be increased to whatever value is needed for the delay)

o. Add an Update List Item activity, update the Endless Loop list, Endless Loop item, changing the value of Counter to the workflow calc variable’s value, configure the activity as shown below:


p. Add a Log to History List activity, configure the log to write “Delay – Ran”

q. The complete workflow configuration should appear as below:


5. Test the Workflows: To test the workflow we only need to start the Endless Loop workflow from our item in the Endless Loop list. After a while we will see that the two workflows will keep initiating each other forming an endless loop.

6. Now Add Your Activity: Now you only need to add your activity to the loop, the best location being right after the Pause for Duration action in the Delay workflow. Once you add your activity here, it will run at the interval that you set in your Pause for Delay.

7. References: Use SharePoint Designer to Email Daily Task Reminders

Monday, January 10, 2011

SharePoint Designer 2007 Workflows 1 – Best Practice Solution for Logging Runtime Workflow Errors

1. Introduction: When employing SharePoint Designer 2007 Workflow (SPDWF) applications it is very important to be able to identify, log and track runtime workflow errors. Typical requirements for this type of solution include the following:

a. Automatic alerts when errors occur – when a workflow error occurs the user will need to be alerted immediately

b. One location error logging – when a workflow error occurs the user will want to go to one location where workflow error information is logged

c. Workflow error step identification – when a workflow error occurs the user will want to go be able to identify which workflow step caused the error

This article will help you develop a best practice solution for logging runtime workflow errors that meets all these requirements.

2. Overview: As an overview let’s first discuss the types of SharePoint Designer Workflow (SPDWF) error logging available to us, the types are listed below:

a. List Item Error Logging: When a SPDWF error occurs that error is logged to the list item’s metadata, and appears as the message “Error Occurred”.

b. Workflow History Error Logging: When a SPDWF error occurs that error is logged to the workflow history for that item, and appears as a variety of messages depending on the error that occurred.

c. Custom Workflow Logging: With properly designed custom workflow logging, the step in which an error occurred in a SPDWF can easily be identified.

3. Best Practice: So to develop our runtime error logging best practice solution we will need to use all three types of error logging capabilities available to us as well as some other out of the box (OOTB) SharePoint capabilities. Our solution will have the following components:

a. Automatic Alerts: We will create a workflow dashboard that alerts an identified user when a workflow error occurs.

b. Workflow History Error Logging: We will leverage the OOTB capabilities of SPDWF error logging to point the user to one error logging location.

c. Workflow Error Step Identification: We will develop a custom workflow log that helps to identify the workflow step that caused the error. (This log will be written to the same location as the OOTB workflow error log).

While the requirements of the solution appear in the order the user will experience them, the design and build for the solution will occur in the opposite order, and so we will discuss the solution components in this order.

4. Design the List and Workflow: For our solution we will develop a very simple list and workflow, just as a straw man to use to illustrate our logging design. The workflow will have three steps, each step with one condition, and two actions. We will use the first step to establish the context of the error (i.e. step one will not cause an error), and we will use the second step to identify an error (i.e. step two will cause an error), and we will use the third step to establish whether or not the workflow completed. Here are the steps to creating our list and workflow:

a. From the SharePoint suite create a new custom list, call it “Workflow Log List”

b. From “Workflow Log List” create a new custom text column, call it “Force Workflow Log Error”, click on “Add to default view” and click OK

c. From “Workflow Log List” create a new custom Boolean column, call it “Workflow Ran”, click on “Add to default view” and click OK

d. From Workflow Log List create two items, for item 1 in the list set the title to “Title 1”, and then set the “Force Workflow Log Error” column to “No Error”, and for item 2 in the list set the title to “Title 2”, and then set the “Force Workflow Log Error” column to “Error”

e. From SPD, create a new custom workflow for the Workflow Log list, call it “Workflow Log”

f. From the “Define your new workflow” screen of the “Workflow Log” workflow set the workflow start options to “Allow this workflow to be manually started from an item”, and “Automatically start this workflow when a new item is created”

g. From Workflow Log workflow, create a workflow step, call it “Workflow Step 1”

h. From Workflow Step 1, create one condition – “If Created By is not empty” – this step will run whenever a list item exist

i. From Workflow Step 1, create two actions – “Update item in this list” and “Log this message to the workflow history list”

j. From the Update item in this list action add logic to update the current item in the list so that the value of our custom text column “Title” is set to “Update Title”

k. From the Log this message to the workflow history list action add logic to write “Workflow Step 1 - Ran” to the History log

l. From Workflow Log workflow, create a second workflow step, call it “Workflow Step 2”

m. From Workflow Step 2, create one condition – “If Created By is not empty” – this step will run whenever a list item exist

n. From Workflow Step 2, create two actions – “Update item in this list” and “Log this message to the workflow history list”

o. From the Update item in this list action add logic to update the current item in the list so that the value of our custom text column “Force Workflow Log Error” is set to “Force Error”

p. From the Log this message to the workflow history list action add logic to write “Workflow Step 2 - Ran” to the History log

q. From Workflow Log workflow, create a third workflow step, call it “Workflow Step 3”

r. From Workflow Step 3, create one condition – “If Created By is not empty” – this step will run whenever a list item exist

s. From Workflow Step 3, create two actions – “Update item in this list” and “Log this message to the workflow history list”

t. From the Update item in this list action add logic to update the current item in the list so that the value of our custom Boolean column “Workflow Ran” is set to “Yes”

u. From the Log this message to the workflow history list action add logic to write “Workflow Step 3 - Ran” to the workflow history list

5. Design the Workflow Dashboard: In addition to our list and workflow we want to design a workflow dashboard, the purpose of the dashboard is to tell us whenever an error occurs in the workflow.

a. From the site create a custom list, call it “Workflow Dashboard”

b. From the Workflow Dashboard list click on Site Actions -> Edit Page

c. From the Edit Page view click on “Add a Web Part”

d. From the Add Web parts dialogue box choose Workflow Log List and then click Add – the Workflow Log List web part will be added

e. Click on the Workflow Dashboard web parts Edit menu and choose Delete – we will not need this list’s default web part

f. From the toolbar of the Workflow Log List web part choose Actions -> Alert Me, this will take you to the New Alert view

g. From the New Alert view accept all the default settings by clicking OK – This will create an Alert that is generated every time there is a change in any of the Workflow Log List items

6. Test the Solution Workflow – No Error: Now we are ready to test our workflow and demonstrate a simple logging message. Follow these steps to test the workflow and generate the logging message:

a. From the Workflow Log List, item 1 (Title 1), click on the list item drop down menu and choose the Workflows menu item

b. From the workflows view page, click on the “Workflow Log” item

c. From the workflow initiation page click on the “Start” button

d. When you are returned to the list item view page you should see the message “Completed” under the Workflow Log column.

e. Click on the “Completed” link under the Workflow Log column and you will be taken to the Workflow Status page

f. On the Workflow Status page under the “Workflow History” page you will find our three custom log entries:

i. Workflow Step 1 – Ran

ii. Workflow Step 2 – Ran

iii. Workflow Step 3 – Ran


 g. You will receive an Alert like the one below, this alert informs you that something has changed in the Workflow Log List, notice that the Workflow Ran field has an entry - “Yes”
  

7. Test the Solution Workflow – Error: Now we are ready to test our workflow error logging by forcing a simple error to occur. Follow these steps to test the workflow and generate the logging message:

a. From the Workflow Log List tool bar, click on Settings, List Settings

b. From the Workflow Log List settings page, under the Columns heading, click on the Force Workflow Log Error column

c. From the Force Workflow Log Error column’s edit column page, at the bottom find the Delete button and click on it, and then choose OK when the warning message appears – This will delete our Force Workflow Log Error column and therefore force our workflow to throw an error when it attempts to update this column

d. From the Workflow Log List, item 2 (Title 2), click on the list item drop down menu and choose the Workflows menu item

e. From the workflows view page, click on the “Workflow Log” item

f. From the workflow initiation page click on the “Start” button

g. When you are returned to the list item view page you should see the message “Error Occurred” under the Workflow Log column

h. Click on the “Error Occurred” link under the Workflow Log column and you will be taken to the Workflow Status page

i. On the Workflow Status page under the “Workflow History” page you will find the following three log entries:

i. Error updating a list item: This is the message concerning the cause of the error – our error was caused by a problem that prevented the update of a list item

ii. Workflow Step 1 – Ran: This is the last step of the workflow that ran successfully

iii. An error has occurred in Workflow Log: This is where the error occurred, by interpretation we know we this is Step 2 because step 1 ran successfully but Step 2 did not


j. You will receive an Alert like the one below, this alert informs you that something has changed in the Workflow Log List, notice that the Workflow Ran field has an entry - “No”


8. Review of Our Design:

a. Workflow Error Step Identification – Custom Error Logs: SPDWF provide many useful conditions and actions, but for our best practice solution, one action is not only useful, it is essential - the “Log to History List” action. In our solution we ensured that each workflow step had a log that identified 1.) The workflow step name and 2.) The workflow step condition

b. Workflow History Error Logging – OOTB SPDWF Error Logging: By combining the OOTB SPDWF error logging with our custom logging, we are able to easily identify at which step the workflow failed

c. Automatic Alerts – Workflow Dashboard: By developing a custom workflow Dashboard we were able to alert the user to when a workflow failed

9. More Advanced Design: In addition to our rather simple alert system we can develop a more advanced alert system that sends a detailed error message with the list item ID, time of error, error message, last successful workflow step, etc. To implement this type of functionality will require developing a custom SharePoint event handler, however, this type of handler would be very useful and very reusable. I won’t cover how to develop that workflow event handler here, but maybe in future articles.

10. Conclusion: By combining both the OOTB SPDWF error logging system, with custom SPDWF logging and custom Alerts we are able to quickly and easily identify, log and track workflow errors.

Tuesday, December 14, 2010

SharePoint Form Dynamic Field Hide or Reveal Using JavaScript

1. From time to time a customer asks for fields to be dynamically hidden or revealed on the SharePoint EditForm.aspx or NewForm.aspx. One the most versatile and effective ways to accomplish this is by using the Content Editor Web Part and JavaScript. In this article I will guide you through configuring and developing this kind of functionality.

2. Here is our scenario; we need to add dynamic capability to a custom task form so that when the user edits the task form and chooses to reassign a task the hidden Reassignment Reason Multi-Line Text field is revealed. Our custom task form will have a customized Task Status field and an additional custom field, Reassignment Reason, as shown below:

a. Task Status (Choice)
  • Assigned
  • In Progress
  • Completed
  • Reassign 
b. Reassignment Reason (Multiple Lines of Text)

3. So the first question you may be asking is “How do I add a CEWP to the Edit and New forms?” I’m glad you asked! While the New and Edit forms do not provide an interface to access to the Edit Page function in the Site Actions menu, you can still get access to this capability through the browser by appending the following query to the end of the URL string for the New and Edit forms:

&pageview=shared&toolpaneview=2 

4. OK, so now that you can see the Edit Page interface of the Task Form lets add a CEWP in the usual way, just click on the “Add a Web Part” control at the top of the Web Part Zone and then from the Webpage Dialogue scroll down to the Miscellaneous section and choose Content Editor Web Part. Now click on the Add button at the bottom of the dialogue page and the CEWP will be added to the page.

5. Now click on the edit button of the CEWP in the Web Part Zone and choose the menu option “Modify Shared Web Part”. This will bring up the web part configuration interface in the right panel. From this interface click on the Source Editor and the text entry dialogue box will open. This is the area where you will need to write your code. We aren’t going to write any code right now though, so you can close the dialogue box.

6. Now we have to talk about the special JavaScript function we will need to use in order to “discover” the SharePoint controls in the task edit page – this function is called “getTagFromIdentifierAndTitle” and it is displayed below:

function getTagFromIdentifierAndTitle(tagName, identifier, title) { 
var len = identifier.length; 
var tags = document.getElementsByTagName(tagName); 

for (var i=0; i < tags.length; i++)

   var tempString = tags[i].id; 
   if (tags[i].title == title && (identifier == ""  ||
tempString.indexOf(identifier) == tempString.length - len))
   { 
       return tags[i];
   }
 } 
   return null; 


7. According to Microsoft this JavaScript function “parses the page’s query string, locates the HTML objects that are rendered by the relevant SharePoint fields, and sets their value.” The function can identify the fields by matching three parameters:

a. tagName – The name of the tag rendered in the form’s HTML
b. identifier – The string associated with the SharePoint type of the relevant field
c. title – The value of the relevant HTML tag’s “title” attribute, which also matches the field’s display name

8. While the title parameter is easy to obtain, one of the challenges you will often face when using this script is finding the tagName and identifier parameters. Microsoft provides a partial list as a starting point - see this tech net article:

http://blogs.msdn.com/b/sharepointdesigner/archive/2007/06/13/using-javascript-to-manipulate-a-list-form-field.aspx

9. However, there is another way to find this information, by using a very handy tool set that comes installed with Internet Explorer 8, and which Microsoft has very cleverly named “Developer Tools”. To activate the Developer Tools in IE, press F12 or use the "Tools" – "Developer Tools" menu. To find out more information about any element, click on the “Select Element” arrow in the tool set, and then select the element on the page. The tool set will take you to that elements markup and code and provide a great deal of information about that element to include the identifier and tag name. (If you don’t have the option of updating IE to 8 or higher, with IE7 you can use Developer Toolbar for Internet Explorer.)

10. OK, so now we need to create our function to hide the Reassignment Reason field when the user opens the page. Here is our basic function outline:

_spBodyOnLoadFunctionNames.push("hideField"); {   
var theInputMLTRR = getTagFromIdentifierAndTitle("TextArea","TextField","Reassignment Reason");  
//*** Hide the Field ***  
function hideField() 

   theInputMLTRR. parentNode.parentNode.parentNode.style.display = "none";
}  

function getTagFromIdentifierAndTitle(tagName, identifier, title) { 
var len = identifier.length; 
var tags = document.getElementsByTagName(tagName); 

for (var i=0; i < tags.length; i++)

   var tempString = tags[i].id; 
   if (tags[i].title == title && (identifier == ""  ||
tempString.indexOf(identifier) == tempString.length - len))
   { 
      return tags[i]; 
   } 

   return null; 
}


 a. spBodyOnLoadFunctionNames.push() – This is a built in SharePoint function that will allow you run a function when the page loads. This will be very useful to us because we want to hide the Reassignment Reason field before the form is viewed by the user. 
b. Script Variables – We need to set one variable, the Multi-Line Text Reassignment Reason. This variable will be set using the getTagFromIdentifierAndTitle function
c. style.display – setting this control property to “none” will hide the control from the user.

 11. Now we have to find a way to reveal the control if the user selects the custom task status choice “Reassign” (as well as a way to hide it back if she changes her mind and chooses another task status after the field is revealed). Here is our next bit of code, our revealField() function:

//*** Reveal the Field *** 
function revealField() 

   theInputMLTRR .parentNode.parentNode.parentNode.style.display = "";
}

12. All we need now is a way to capture the onChange() event for the custom Task Status field:

var theChoice = getTagFromIdentifierAndTitle("TextArea","TextField","Reassignment Reason");  
getTagFromIdentifierAndTitle("TextArea","TextField","Reassignment Reason").onchange = function(){revealHideControl()};  

//*** Reveal the Field *** 
function revealHideControl(){  
if (theChoice.value == 'Reassign') { 
revealField(); 
}else 

hideField(); 


13. All we have to do now is copy our script into the CEWP, so let’s go back to the web part configuration interface in the right panel. From this interface click on the Source Editor and the text entry dialogue box will open. Now just copy and paste the code below into the text box and click “Save” which will close the dialogue box. From the right panel interface click “OK” and then from the EditForm.aspx click OK again, and your form is ready to test.

_spBodyOnLoadFunctionNames.push("hideField"); {  
var theInputMLTRR = getTagFromIdentifierAndTitle("TextArea","TextField","Reassignment Reason");  

//*** Hide the Field *** 
function hideField() 

theInputMLTRR. parentNode.parentNode.parentNode.style.display = "none"; 
}  

//*** Reveal the Field *** 
function revealField() 

theInputMLTRR .parentNode.parentNode.parentNode.style.display = ""; 
}  

//*** Capture the Change Event *** 
var theChoice = getTagFromIdentifierAndTitle("select","DropDownChoice","Task Status");  
getTagFromIdentifierAndTitle("select","DropDownChoice","Task Status")onchange = function(){revealHideControl()};  

//*** Reveal or Hide the Field *** 
function revealHideControl()
{  
   if (theChoice.value == 'Reassign')
   { 
      revealField(); 
   } 
   else 
  { 
      hideField(); 
  } 


//*** getTagFromIdentifierAndTitle *** 
function getTagFromIdentifierAndTitle(tagName, identifier, title) { 
var len = identifier.length; 
var tags = document.getElementsByTagName(tagName); 

for (var i=0; i < tags.length; i++)

    var tempString = tags[i].id; 
    if (tags[i].title == title && (identifier == ""  ||
tempString.indexOf(identifier) == tempString.length - len))
   { 
      return tags[i]; 
   } 

   return null; 

}

14. There are other ways to find controls, such as using the returnObjById(id) function, but for whatever reason, Microsoft doesn’t recommend using this approach. On the other hand, in the SharePoint Community the getTagFromIdentifierAndTitle function is well known, well documented, and heavily used, so I recommend starting with this method whenever possible.

I hope that helps!

Tom Molskow


Tuesday, August 31, 2010

Checklist for a Virtual SharePoint 2007 Developer's Build

This is a quick Blog that provides a checklist for a virtual SharePoint 2007 developer's build:

1. Software List:
a. Virtual PC 2007
b. Windows Server 2003 R2
c. Microsoft SQL Server 2008 Enterprise
d. Microsoft Office SharePoint Server 2007 for Enterprise
e. SMTP Server
f. POP3 Server
g. Visual Studio 2008 Professional
h. SharePoint Designer 2007
i. Microsoft Office Viso 2007
j. Microsoft Office InfoPath 2007
k. Microsoft Office 2007 Professional
l. Microsoft Windows SDK v6.0A
m. Office SharePoint Server 2007 SDK
n. MSDN Library for Visual Studio 2008
o. Visual Studio Extensions for WSS 3.0 v1.3
p. WSPBuilder
q. Snippy – Visual Code Snippet Editor
r. NClass
s. SharePoint ULS Log Viewer
t. Windows PowerShell and PowerShell ISE
u. All Microsoft High Priority Updates

2. Virtual PC Install and Configuration:
a. Download Virtual PC 2007 (VPC07)
b. Install VPC07
c. Create a new Virtual Hard Drive (VHD)
d. Allocate 2750 KB’s of RAM to the VHD
e. Allocate at Least 100 GB of disk space to the VHD
f. Enable Undo Disk
g. Enable CD\DVD Second Controller
h. Set Floppy Disk to Auto Detect
i. Set COM 1 to the Physical COM 1 Port
j. Set LPT 1 to the Physical LPT 1 Port
k. Configure Networking to use the host system’s NIC
l. Enable Sound
m. Enable Hardware-Assisted Virtualization
n. Create a Share Folder
o. Set Display to use the guest operating system’s resolution
p. Set Close to Display all three options at shutdown: Save State, Shut Down, Turn Off

3. Operating System Install and Configuration:
a. Install Windows 2003 R2
   i. Obtain the proper ISO images and license Keys
   ii. Run Install Disk 1
   iii. Set Administrator’s Password
   iv. Run Install Disk 2
   v. Turn off Automatic Updates (this system will not be allowed to access the Internet)
   vi. Turn off Windows Firewall
b. Install Service Packs and Updates
   i. Install Windows Server 2003 R2 Service Pack 2
   ii. Got to the Windows Update Site and install all required updates
c. Assign Application Server Role to the Server
   i. From Manage Your Server assign the Application Server role
   ii. Install FrontPage Extensions
   iii. Enable ASP.NET
d. Install Active Directory Role
   i. From Manage Your Server assign the Active Directory role
   ii. Ignore the message about Static IP, choose Dynamically Assigned IP
   iii. FQDN: vmossdev.myserver.com(“v” for virtual)
   iv. Choose the option to install and configure DNS on the local server
e. Create all the SharePoint Service Accounts in Active Directory (See the MOSS 07 Installation Guide pages 12-14 for more detail)
f. Set all SharePoint Service Account GPO’s Directory (See the MOSS 07 Installation Guide pages 12-14 for more detail)
g. Create User Test Accounts in the Active Directory Users OU (password never expires): John Smith, Jane Smith, Joe Smith, June Smith
h. Check Windows Event Logs for errors and correct as needed

4. Database Server Install and Configuration:
a. Install SQL Server 2008
   i. Run the Installation Wizard
   ii. At the Feature Selection install step choose to install “All Features”
   iii. Choose “Default Instance”
   iv. Set SQL Agent to “Automatic”
   v. For SQL Server Reporting Services install the SharePoint Integration Mode Default Configuration
b. Install SQL Server 2008 Service Pack 1
c. Install the Adventure Works Database (the Adventure Works Database contains sample data for developing reporting applications)

5. Microsoft Office SharePoint Server 2007 Installation and Configuration:
a. Complete SharePoint 2007 Pre-Install Steps
   i. Disable Windows Fire Wall
   ii. Disable Internet Explorer Enhanced Security
   iii. Configure Component Services Directory (See the MOSS 07 Installation Guide pages 19-21 for more detail)
   iv. Install the SMTP Mail Server (* Access to production Exchange or other external Mail servers will not be allowed on the Development Server, this step is taken only to provide the capability to receive mail from another server in the Development environment.)
b. Install SharePoint
   i. Run the SharePoint Products and Technologies Configuration Wizard
   ii. Choose New Server Farm
   iii. Choose Complete Install
   iv. Use the SPSServerFarm account for the Database access account
c. Install Windows SharePoint Services 3.0 Service Pack 1
d. Install 2007 Microsoft Office Servers Service Pack 1
e. Perform Basic SharePoint 2007 Configuration (See the MOSS 07 Installation Guide pages 19-21 for more detail)
   i. Choose Single Server or Web Server
   ii. Start Windows SharePoint Services Help Search
      1. Service Account: Domain\SPSWSSSearch
      2. Content Access Account: Domain\SPSWSSCrawl
   iii. Configure and Office SharePoint Server Search Service
      1. Use this server for indexing content
      2. Use this server for serving search queries
      3. Farm Search Service Account: Domain\SPSMOSSCrawl
      4. Index Performance Partly Reduced
      5. Use All Web Front Ends for Crawling
   iv. Start Excel Calculation Services
   v. Create the Portal Web Application Pool (Port - 80)
   vi. Create the Portal Site Collection
   vii. Create the SSP Web Application Pool (Port - 400)
   viii. Create the MySite Web Application Pool (Port - 8000)
   ix. Create the SSP using the SSP and MySite Web Application Pools
   x. Configure Workflow Settings
   xi. Configure Outgoing E-mail
   xii. Enable Excel Services
   xiii. Configure Diagnostic Logging
   xiv. Enable Self Service Site Creation
   xv. Configure Session State (120 Minutes)
   xvi. Enable Features on Existing Sites
f. SharePoint Advanced Configuration
   i. Create managed paths: Search, Record Center, Report Center, Document Center, Publishing, collaboration, Development
   ii. Create a Record Center
   iii. In Central Administration, set the Record Center as the default
   iv. Create a Report Center
   v. Create a Document Center
   vi. Create a Publishing Site
   vii. Create a Collaboration Portal
   viii. Create a Search Center
   ix. Configure the Record Center, Document Center, Report Center, to use the Search Center for Advanced Search (See the MOSS 07 Installation Guide pages 97-98 for more detail)
   x. Publish Links for the Document Center, Publishing Portal and Collaboration Portal
   xi. Enable Usage Processing, 15 Log Files, Times - between 8:00 and 6:00 PM
   xii. Create Content Sources for the Portal, Record Center, Report Center, and Document Center
   xiii. Schedule Weekly Full Crawls for the Content Sources
   xiv. Schedule Incremental Crawls for the Content Sources
   xv. Run Full Crawl on all Content Sources
   xvi. Create a MySite (as Administrator)
   xvii. Configure Diagnostic Logging as needed for Development, example:
      1. Web Part Development: Category – Web Parts, Least Critical Event Log – Error, Least Critical Trace Log – Medium
      2. Workflow Development: Category – Workflow Features, Least Critical Event Log – Error, Least Critical Trace Log – Medium
g. Shared Service Provider Configuration
   i. Configure Usage Reporting:
      1. Enable Advanced Usage Analysis Processing
      2. Enable Search Query Logging
   ii. Start a Full User Profile Import
   iii. After Import has completed remove all profiles except the test users and the administrator
   iv. Create an Audience for Administrator’s, skills = Administrator, compile Audience
h. Configure Search in CA
   i. Contact E-Mail: searchservice@mossdev.net
   ii. Do not connect by using a proxy server
   iii. Timeouts: Connection – 60, Request – 60
   iv. Ignore SSL Certificate Warnings
i. Configuration Search in SSP
   i. Configure the Full Crawl Schedule for the Default Content Type
   ii. Configure the Incremental Crawl Schedule for the Default Content Type
   iii. Start a Full Crawl
   iv. After the Full Crawl has completed examine the Crawl Log for Errors and Correct as Needed

6. Development Tools Installs and Configurations:
a. Visual Studio 2008
   i. Install Visual Studio 2008
   ii. Install MSDN Library
   iii. Install Visual Studio 2008 SP1
b. Install SharePoint 2007 SDK 1.5
c. Install Visual Studio Extensions for WSS3.0 1.4 (for Visual Studio 2008)
d. Install SharePoint Designer 2007

7. Office Application Installs and Configurations:
a. Install Office 2007 Professional
b. Install Office 2007 Professional Updates
c. Activate Microsoft Office Products

8. SharePoint Tools Installs
a. Install WSP Builder
b. Install Snippy
c. Install NClass
d. Install SharePoint ULS Log Viewer
e. Windows PowerShell and PowerShell ISE

9. Activate All Software Products Online


And that's all there is to it!