This Blogs will discuss the third party workflow tool - K2 BlackPoint. As you may know, K2 BlackPoint is the GUI only version of K2 BlackPearl in the same way SharePoint Designer (SPD) workflows are the GUI only version of Visual Studio workflows. In many ways K2 BlackPoint workflows are more powerful then SPD workflows but on the flip side, in many other ways they are more obscure and difficult. This is designed to get you through the more obscure and difficult design tasks so you can get your project developed and deployed! So let's get started...
1. While many difficult development tasks are often much easier to perform with a GUI design tool such as K2 BlackPoint, often times, the reverse is also true, i.e. many simple development tasks are often much more difficult to perform with a design tool. For example, the For Each Loop is a construct that is common to all development languages and scripts and yet this capability is totally absent from the K-2 BlackPoint GUI tool set (and to be fair it is also absent from the SharePoint Designer tool set). The For Each Loop is obviously a very useful construct, we could use it to archive all the content in a list that is past a certain date, parse through all the items in a list and update metadata values, or even loop through all the lists on a site and change their security settings. Without this construct in our tool kit we are definitely missing some very useful capabilities. But there is good news! Even though there isn’t an Out of the Box way to create a For Each Loop in K2 BlackPoint, there is still a way to create this functionality through configuration and that’s what the following discussion will demonstrate.
2. To begin with we will create our SharePoint lists. We will need to create a list with a metadata value that can be changed by our K2 BlackPoint For Each Loop, so we will add a Boolean value that can be flipped from No to Yes. Create a list called SPLoopList and give it the following metadata names and types:
a. Single Line of Text – Title
b. Yes/No – Processed
Now add five records to the list, giving each one the title Processed n, and setting each Boolean filed to No.
3. Next, we need to create a list for logging our workflow actions. In development it’s always good to create your own verbose log for error catching and analysis, and since we are using a SharePoint site already, it’s quick and easy to create a log as a custom list. Create a list called SPLog and give it the following metadata names and types:
a. Single Line of Text – Title
b. Multiple Lines of Text – Log
You don’t need to create any items in this list; our K2 workflow will do that for us.
4. Now for the workflow! Let’s create a new K2 Project, we will call it K2Utilities. Next create a SharePoint Process for your new project, let’s call that ForEachLoop. Now in K2 Studio create the basic process structure as follows:
a. Create a Process called “Search”
b. Create a Process called “Update”
c. Create a Process called “End”
d. Draw a line between Start and Search, label it “Search”
e. Draw a line Between Search and Update, label it “Update”
f. Draw a line loop back from Update to Search, label it “Loop”
g. Draw a line from Search to End, label it “End”
The process you have designed so far should look like this:

5. Next we have to associate this workflow with our SharePoint list – SPLoopList. To do this, follow this steps in K2 Studio:
a. Under the Process Tab click on the SharePoint Workflow button
b. From the SharePoint Workflow Integration dialogue box choose to Associate this Workflow with: A SharePoint List or Document Library and then click the Next button
c. From the Connection Settings dialogue box click on the ellipsis box to choose the SharePoint Site URL you will use
d. On the pop-up Context Browser choose SharePoint Servers, and then the name of the SharePoint Site you will use (this would be the site that contains the SPLog and SPLoopList)
e. Back in the Connection Settings for the List or Library setting panel click on the browse button and choose the SPLoopList
f. Now click Finish
Our Workflow is now associated with our list!
6. Now let’s configure our Start Process to run the workflow Manually, follow the steps below:
a. Right click on the Start Activity and from the pop-up context menu choose Properties
b. From the Process General Properties Menu choose the Actions Icon which would be all the way at the bottom left of the dialogue box
c. At the Actions menu click back, this will take you to the K2 Welcome screen
d. At the K2 Welcome screen click in the box labeled Run this wizard in Advanced Mode and click Next
e. Keep clicking Next until you get to the Start Options screen, at this screen choose the Start Option – Allows this workflow to be started by an authenticated user with Edit Items Permissions, then click Finish
7. So let’s create the logic for our Search Activity, first we will need to create a SharePoint Search Event:
a. From the Event Wizard Explorer Drag a SharePoint Search Event unto the Search activity surface
b. From the SharePoint Search Results configuration wizard splash screen click Next
c. From the Event Name and Action panel name the event Find Processed No and then choose Search in a SharePoint List or Library and click Next
d. From the Search List or Library panel choose the same site and list that you choose in step 5, then click Next
e. From the Search Filters panel click on the Add button and then configure the Add Filter dialogue as you see below and then click OK and Next
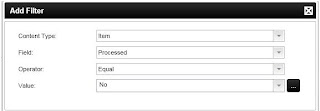
f. In the Store and Limit Results panel next to the Content Field text box click on the Create button and Name the Content Field “SearchResults”, and click OK
g. Back at the Store and Limit Results panel in the Maximum Results text box put the number 1 and make sure the No Limit box is unchecked, if your configurations appear as below then click Next

h. Now click Finish
8. Now that we have created a SharePoint Search Event, we need to create a SharePoint List Items event for our SPLog:
a. From the Event Wizard Explorer Drag a SharePoint List Items event unto the Search activity surface
b. From the SharePoint List Items configuration wizard splash screen click Next
c. From the Event Name and Action panel name the event Create Log Search and then choose Create List Items and click Next
d. From the Create List Item panel choose the same Site that you chose in step 5, but for your list choose the SPLog list, then click Next
e. From the List Item metadata panel click on Title and then click on Assign and Type “Search”
f. From the List Item metadata panel click on Log, click on Assign and then in the Log multiline text box type “Search Results: “, now click on the Ellipsis box and from the Context Browser choose the SearchResults content type and Item metadata and click Add
g. Back in the Log multiline text box type add a return and then type “Item ID: “, now click on the Ellipsis box and from the Context Browser choose the SharePoint_Item content type and then the Items – Item – ID metadata and click Add, if your Log multi-line text box appears as below then click OK, Next and Finish

9. The Next step is to add a Null content type which we will need for our line rule. To create a Null content type follow these steps:
a. From the Object Browser Environment Tab click on XML Fields group to open it and then right click on the ForEachLoop and Choose Add
b. In the Add XML Field dialogue box, under the General Tab, in the Name field enter “Null”
c. In the Initial Value field enter the following -
d. In the Metadata field enter the following -
e. Click OK to close the Add XML Field dialogue box
10. Now we can create a Liner rule for our Update Line. We want this rule to check the search results, and only process the next activity if the search results are not null. To create this line rule follow these steps:
a. Right click on the Update line and choose properties from the context menu list
b. From the Line General Properties panel click on the Line icon on the left
c. From the Line Rule panel click on the Add button
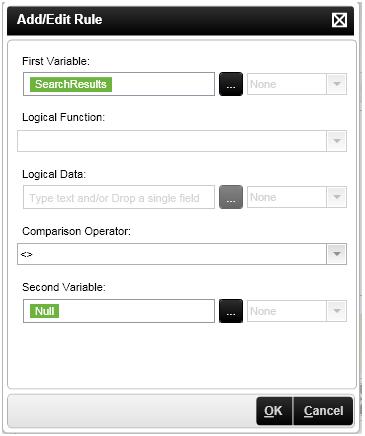
d. In the Add/Edit dialogue box add these values
i. First Variable: SearchResults
ii. Comparison Operator: <> (Does Not Equal)
iii. Second Variable: Null
e. Your Add/Edit Rule Panel should appear as below:

f. Now click OK and Finish
11. Next we need to create a SharePoint List Items event for the Update activity. Follow these steps to create the event:
a. From the Event Wizard Explorer Drag a SharePoint List Items event unto the Update activity surface
b. From the SharePoint List Items configuration wizard splash screen click Next
c. From the Event Name and Action panel name the event Update List and then choose Update List Items: SharePoint List Items and click Next
d. From the Update List Item panel choose the same Site that you chose in step 5, but for your list choose the SPLoopList, then for the List Item ID choose the SearchResults_Items_Item XML field from the Context Browser Process/Activity Data, the dialogue box should appear as below:
 e. Now click Next
f. From the List Item metadata panel click on Processed and then click on Assign and choose “Yes”, then click OK, Next and Finish
12. OK, now our Update Activity needs to overwrite the SearchResults content type and set all values to Null. If we don’t do this when the Find Processed No Search Event runs again it will simply append the new item ID number to the existing one giving us results like 12, 123, 124, etc. To work around this problem we will create a K2 Data Event – follow the steps below:
a. Drag and Drop a K2 Data Event unto the Update activity
b. From the initial wizard panel click Next
c. At the Data Event Panel name the event “UpdateSearchResults” and under Data Replication choose Transfer Data and click Next
d. In the Data Locations panel click on the Assign button which will open a new Assign dialogue box
e. From the Assign panel choose the Source as the Process Activity Data – For Each Loop – Null value
f. Still from the Assign panel choose the Destination as the Process Activity Data – For Each Loop – Search Results value, then click Finish
g. Click Finish again
13. To finish off this activity we need to create another log event, we can easily do this by simply copying the log event from our Search activity, follow these steps:
a. In the Search activity right click on the Create Log Search event and from the pop-up context menu choose copy
b. Now hover your mouse over the Update activity, right click, from the pop-up context menu choose paste
c. Now double click on the Create Search Log event in the Update activity to open the event wizard, click Next
d. In the Event Name and Action panel change the event name to Create Log Update, click Next and then Next again
e. In the List Item Metadata panel change the Title to Update, change the Note field to change the Search results Text to Update, leave the rest as it is and then click next and Finish
14. Now we can create the conditional logic for our Exit Loop line. Follow the steps below:
a. Right click on the Exit Loop line and choose properties from the context menu list
b. From the Line General Properties panel click on the Line icon on the left
c. From the Line Rule panel click on the Add button
d. In the Add/Edit dialogue box add these values
i. First Variable: SearchResults
ii. Comparison Operator: = (Equals)
iii. Second Variable: Null
e. Your Add/Edit Rule Panel should appear as below:

f. Now click OK and Finish
15. OK, we’re getting close, four our next step we are going to create another log event, we can easily do this by simply copying the log event from our Search activity again, follow these steps:
a. In the Search activity right click on the Create Log Search event and from the pop-up context menu choose copy
b. Now hover your mouse over the End activity, right click, from the pop-up context menu choose paste
c. Now double click on the Create Search Log event in the Update activity to open the event wizard, click Next
d. In the Event Name and Action panel change the event name to Create Log End, click Next and then Next again
e. In the List Item Metadata panel change the Title to End, change the Note field to change the Search results Text to End, leave the rest as it is and then click next and Finish
16. Finally, we need to hook up the error catching/logging mechanisms by enabling the Exception Properties on all the Activities and Lines, you will enable these properties:
a. Enable exception rule
b. Log exception to the server
c. Log exception to the error log
17. Save the Project and then click on the Orange Deployment arrow.
18. Now go to your list and run the workflow. In a few seconds you should see every item in the list updated by the workflow – a For Each Loop in a GUI driven workflow design tool – whurah!
I hope that helps!
Tom Molskow
Senior SharePoint Architect
1. While many difficult development tasks are often much easier to perform with a GUI design tool such as K2 BlackPoint, often times, the reverse is also true, i.e. many simple development tasks are often much more difficult to perform with a design tool. For example, the For Each Loop is a construct that is common to all development languages and scripts and yet this capability is totally absent from the K-2 BlackPoint GUI tool set (and to be fair it is also absent from the SharePoint Designer tool set). The For Each Loop is obviously a very useful construct, we could use it to archive all the content in a list that is past a certain date, parse through all the items in a list and update metadata values, or even loop through all the lists on a site and change their security settings. Without this construct in our tool kit we are definitely missing some very useful capabilities. But there is good news! Even though there isn’t an Out of the Box way to create a For Each Loop in K2 BlackPoint, there is still a way to create this functionality through configuration and that’s what the following discussion will demonstrate.
2. To begin with we will create our SharePoint lists. We will need to create a list with a metadata value that can be changed by our K2 BlackPoint For Each Loop, so we will add a Boolean value that can be flipped from No to Yes. Create a list called SPLoopList and give it the following metadata names and types:
a. Single Line of Text – Title
b. Yes/No – Processed
Now add five records to the list, giving each one the title Processed n, and setting each Boolean filed to No.
3. Next, we need to create a list for logging our workflow actions. In development it’s always good to create your own verbose log for error catching and analysis, and since we are using a SharePoint site already, it’s quick and easy to create a log as a custom list. Create a list called SPLog and give it the following metadata names and types:
a. Single Line of Text – Title
b. Multiple Lines of Text – Log
You don’t need to create any items in this list; our K2 workflow will do that for us.
4. Now for the workflow! Let’s create a new K2 Project, we will call it K2Utilities. Next create a SharePoint Process for your new project, let’s call that ForEachLoop. Now in K2 Studio create the basic process structure as follows:
a. Create a Process called “Search”
b. Create a Process called “Update”
c. Create a Process called “End”
d. Draw a line between Start and Search, label it “Search”
e. Draw a line Between Search and Update, label it “Update”
f. Draw a line loop back from Update to Search, label it “Loop”
g. Draw a line from Search to End, label it “End”
The process you have designed so far should look like this:

5. Next we have to associate this workflow with our SharePoint list – SPLoopList. To do this, follow this steps in K2 Studio:
a. Under the Process Tab click on the SharePoint Workflow button
b. From the SharePoint Workflow Integration dialogue box choose to Associate this Workflow with: A SharePoint List or Document Library and then click the Next button
c. From the Connection Settings dialogue box click on the ellipsis box to choose the SharePoint Site URL you will use
d. On the pop-up Context Browser choose SharePoint Servers, and then the name of the SharePoint Site you will use (this would be the site that contains the SPLog and SPLoopList)
e. Back in the Connection Settings for the List or Library setting panel click on the browse button and choose the SPLoopList
f. Now click Finish
Our Workflow is now associated with our list!
6. Now let’s configure our Start Process to run the workflow Manually, follow the steps below:
a. Right click on the Start Activity and from the pop-up context menu choose Properties
b. From the Process General Properties Menu choose the Actions Icon which would be all the way at the bottom left of the dialogue box
c. At the Actions menu click back, this will take you to the K2 Welcome screen
d. At the K2 Welcome screen click in the box labeled Run this wizard in Advanced Mode and click Next
e. Keep clicking Next until you get to the Start Options screen, at this screen choose the Start Option – Allows this workflow to be started by an authenticated user with Edit Items Permissions, then click Finish
7. So let’s create the logic for our Search Activity, first we will need to create a SharePoint Search Event:
a. From the Event Wizard Explorer Drag a SharePoint Search Event unto the Search activity surface
b. From the SharePoint Search Results configuration wizard splash screen click Next
c. From the Event Name and Action panel name the event Find Processed No and then choose Search in a SharePoint List or Library and click Next
d. From the Search List or Library panel choose the same site and list that you choose in step 5, then click Next
e. From the Search Filters panel click on the Add button and then configure the Add Filter dialogue as you see below and then click OK and Next

f. In the Store and Limit Results panel next to the Content Field text box click on the Create button and Name the Content Field “SearchResults”, and click OK
g. Back at the Store and Limit Results panel in the Maximum Results text box put the number 1 and make sure the No Limit box is unchecked, if your configurations appear as below then click Next

h. Now click Finish
8. Now that we have created a SharePoint Search Event, we need to create a SharePoint List Items event for our SPLog:
a. From the Event Wizard Explorer Drag a SharePoint List Items event unto the Search activity surface
b. From the SharePoint List Items configuration wizard splash screen click Next
c. From the Event Name and Action panel name the event Create Log Search and then choose Create List Items and click Next
d. From the Create List Item panel choose the same Site that you chose in step 5, but for your list choose the SPLog list, then click Next
e. From the List Item metadata panel click on Title and then click on Assign and Type “Search”
f. From the List Item metadata panel click on Log, click on Assign and then in the Log multiline text box type “Search Results: “, now click on the Ellipsis box and from the Context Browser choose the SearchResults content type and Item metadata and click Add
g. Back in the Log multiline text box type add a return and then type “Item ID: “, now click on the Ellipsis box and from the Context Browser choose the SharePoint_Item content type and then the Items – Item – ID metadata and click Add, if your Log multi-line text box appears as below then click OK, Next and Finish

9. The Next step is to add a Null content type which we will need for our line rule. To create a Null content type follow these steps:
a. From the Object Browser Environment Tab click on XML Fields group to open it and then right click on the ForEachLoop and Choose Add
b. In the Add XML Field dialogue box, under the General Tab, in the Name field enter “Null”
c. In the Initial Value field enter the following -
d. In the Metadata field enter the following -
e. Click OK to close the Add XML Field dialogue box
10. Now we can create a Liner rule for our Update Line. We want this rule to check the search results, and only process the next activity if the search results are not null. To create this line rule follow these steps:
a. Right click on the Update line and choose properties from the context menu list
b. From the Line General Properties panel click on the Line icon on the left
c. From the Line Rule panel click on the Add button
d. In the Add/Edit dialogue box add these values
i. First Variable: SearchResults
ii. Comparison Operator: <> (Does Not Equal)
iii. Second Variable: Null
e. Your Add/Edit Rule Panel should appear as below:
f. Now click OK and Finish
11. Next we need to create a SharePoint List Items event for the Update activity. Follow these steps to create the event:
a. From the Event Wizard Explorer Drag a SharePoint List Items event unto the Update activity surface
b. From the SharePoint List Items configuration wizard splash screen click Next
c. From the Event Name and Action panel name the event Update List and then choose Update List Items: SharePoint List Items and click Next
d. From the Update List Item panel choose the same Site that you chose in step 5, but for your list choose the SPLoopList, then for the List Item ID choose the SearchResults_Items_Item XML field from the Context Browser Process/Activity Data, the dialogue box should appear as below:

f. From the List Item metadata panel click on Processed and then click on Assign and choose “Yes”, then click OK, Next and Finish
12. OK, now our Update Activity needs to overwrite the SearchResults content type and set all values to Null. If we don’t do this when the Find Processed No Search Event runs again it will simply append the new item ID number to the existing one giving us results like 12, 123, 124, etc. To work around this problem we will create a K2 Data Event – follow the steps below:
a. Drag and Drop a K2 Data Event unto the Update activity
b. From the initial wizard panel click Next
c. At the Data Event Panel name the event “UpdateSearchResults” and under Data Replication choose Transfer Data and click Next
d. In the Data Locations panel click on the Assign button which will open a new Assign dialogue box
e. From the Assign panel choose the Source as the Process Activity Data – For Each Loop – Null value
f. Still from the Assign panel choose the Destination as the Process Activity Data – For Each Loop – Search Results value, then click Finish
g. Click Finish again
13. To finish off this activity we need to create another log event, we can easily do this by simply copying the log event from our Search activity, follow these steps:
a. In the Search activity right click on the Create Log Search event and from the pop-up context menu choose copy
b. Now hover your mouse over the Update activity, right click, from the pop-up context menu choose paste
c. Now double click on the Create Search Log event in the Update activity to open the event wizard, click Next
d. In the Event Name and Action panel change the event name to Create Log Update, click Next and then Next again
e. In the List Item Metadata panel change the Title to Update, change the Note field to change the Search results Text to Update, leave the rest as it is and then click next and Finish
14. Now we can create the conditional logic for our Exit Loop line. Follow the steps below:
a. Right click on the Exit Loop line and choose properties from the context menu list
b. From the Line General Properties panel click on the Line icon on the left
c. From the Line Rule panel click on the Add button
d. In the Add/Edit dialogue box add these values
i. First Variable: SearchResults
ii. Comparison Operator: = (Equals)
iii. Second Variable: Null
e. Your Add/Edit Rule Panel should appear as below:

f. Now click OK and Finish
15. OK, we’re getting close, four our next step we are going to create another log event, we can easily do this by simply copying the log event from our Search activity again, follow these steps:
a. In the Search activity right click on the Create Log Search event and from the pop-up context menu choose copy
b. Now hover your mouse over the End activity, right click, from the pop-up context menu choose paste
c. Now double click on the Create Search Log event in the Update activity to open the event wizard, click Next
d. In the Event Name and Action panel change the event name to Create Log End, click Next and then Next again
e. In the List Item Metadata panel change the Title to End, change the Note field to change the Search results Text to End, leave the rest as it is and then click next and Finish
16. Finally, we need to hook up the error catching/logging mechanisms by enabling the Exception Properties on all the Activities and Lines, you will enable these properties:
a. Enable exception rule
b. Log exception to the server
c. Log exception to the error log
17. Save the Project and then click on the Orange Deployment arrow.
18. Now go to your list and run the workflow. In a few seconds you should see every item in the list updated by the workflow – a For Each Loop in a GUI driven workflow design tool – whurah!
I hope that helps!
Tom Molskow
Senior SharePoint Architect
No comments:
Post a Comment